For the past few months I’ve been working with Christopher Thielen and the UI-Router team on the React implementation of the infamous UI-Router.
React Router is currently the most used routing library in the React ecosystem, I thought having a comparison could be helpful for anyone who is already familiar with it and wants to try UI-Router out.
Since the two libraries differ a lot, I think they provide solutions for different needs. The routing library is a big player in the application architecture and stack. Based on the time availability, team size, longevity of the code base and many other factors, you may find both a valid choice for you. Or neither.
State Routing vs Url Routing
The main difference between the two is the underlying implementation for handling the application navigation state.
React Router and url routing
React Router is a url based router:
React Router keeps your UI in sync with the URL. […] Make the URL your first thought, not an after-thought.
React Router watches for changes in the browser url, and syncs the UI accordingly (it has many more features but will we have a lot at them later). You provide a route configuration that tells the router how to match the URL and which component to render when it finds a match. You can nest routes definition for composing your url match criteria, and alongside pathless routes you can create complex layouts.
The route configuration is done in JSX, and this is an example:
render(
  <Router>
    <Route path="/" component={App}>
      <IndexRoute component={Home} />
      <Route path="about" component={About} />
      <Route component={Inbox}>
        <Route path="messages/:id" component={Message} />
      </Route>
    </Route>
  </Router>,
  document.body
);
You can also define routes with a object notation when you are in need of composing the routing configuration (or for lazy-loading). With huge applications this is always the case, but the object notation syntax feels like a second citizen in React Router, and having to radically change the way you define your routes as the application grows may be overwhelming. But that’s my opinion.
Since the <Router> component will handle the rendering for you, that’s pretty much it in terms of URL -> UI.
You write your UI components and React Router takes care of syncing wich component is rendered given a url.
Simple yet powerful.
UI-Router and state routing
UI-Router is a state based routing library. The application navigation state is handled by a state machine.
You define states in which your application can be and only one state can be active at any given time. Every state describes the UI for a feature of the application, and may also describe a URL. You can nest states for a fine-grained control of your application navigation flow. States are the basic building block of a UI-Router application.
The hierarchy of states form a tree that describes “where” user can be in the application. Since the navigation is state based, one big difference we can already notice is that you cloud write a whole functioning app without ever changing the browser url, since it’s not needed for navigation to work.
Of course this isn’t ideal, and in fact you can assign a URL to every state. The router builds the URL from the active state and the accumulated path from its ancestors, and syncs the browser url.
This is an example of states definition in UI-Router:
const states = [{
  name: 'app'
  component: App
},{
  name:'home',
  url: '/',
  component: Home
},{
  name: 'about',
  url: '/about',
  component: About
},{
  name: 'inbox',
  abstract: true,
  component: Inbox
},{
  parent: 'inbox',
  name: 'message',
  url: 'messages/:id',
  component: Message
}];

states.forEach(state => Router.stateRegistry.register(state));
The state definition is more verbose, but can be easily broken down into sub folders/files and imported into a main routing configuration file.
The actual rendering of the components is done by UI-Router via the <UIView> component.
You always need to provide at least one, or the router wouldn’t know where to mount them.
In fact the most basic and simple set up would be:
render(<UIView />, document.getElementById('root'));This way the <UIView> will do the actual rendering of your components defined in your states definition.
You may also include other <UIView> components inside those components, effectively nesting <UIView>s.
This is useful for creating more complicated layouts:
// states definition
const someStates = [
  {
    name: 'inbox',
    url: '/inbox',
    component: Inbox,
  },
  {
    parent: 'inbox',
    name: 'message',
    url: '/:id',
    component: Message,
  },
];

// code code code...

// the Inbox component includes a <UIView>
const Inbox = () => (
  <div>
    <h3>This is Inbox!</h3>
    <UIView />
  </div>
);

const Message = () => (
  <div>
    <h4>This is a message</h4>
    <p>Lorem ipsum...</p>
  </div>
);

// code code code...

// this is the "main" UIView
render(<UIView />, document.getElementById('root'));
When the inbox state is active the <Inbox> component will be rendered by the “main” <UIView>.
Since no child state is active, the <UIView> included in <Inbox> will be empty.
Once the user navigates to inbox.message, the <Message> component will be loaded in the nested <UIView>.
Under the hood UI-Router React uses React Context for keeping track of the <UIView> and takes care of rendering the components whenever the active state changes.
Transitions
Every time the user navigate through the app a transition between routes or states occurs. Both the libraries provide a way to perform logic for useful operations, like requiring authentication for a given application feature.
React Router and onLeave & onEnter hooks
React Router provides a two function hooks: EnterHook and LeaveHook.
These two functions can be defined for each route definition and will be called whenever the route is about to be rendered or unmounted (once the transition is confirmed by the routerWillLeave component method).
The functions are called with three arguments, the next router state, a replace function for redirecting the user and a third optional callback used in case you need to perform async the hook.
UI-Router transition service
In UI-Router transitions work just like transactions, they either succeed or fail. A transition life cycle is defined by these steps:
- before: before the async portion of a transition has begun
- start: the transition has begun
- exit: the transition is exiting states
- retain: states are retained (a state was active, and is neither being exited nor entered)
- enter: the transition is entering states
- finish: the transition is finishing
- success/error: after the transition is complete
You may register hooks at any stage of a transition. They can alter it by pausing (while waiting on some promise), canceling or redirect it to a new target state. When registering a hook, you can provide criteria (a state name, a glob, or a function), and you can modify the transition by returning something from the hook (an abort, a redirect, a promise, or some new resolves to add to the transition).
Parameters and Fetching data
Router libraries often provide other advanced features: data fetching, parameters, server side rendering and so on. Here is where the differences between the two are clearer.
React Router params
The path are interpolated literally, except for a few special symbol that allow you to build any sort of custom url:
:paramName- URL segment until next/,?or#()- URL optional portion*/**- Match all chars (greedy and non)
The rendered component will have a param object prop injected where you can access them, and do whatever you need to.
Usually fetch some data or layout/UI logic.
React Router doesn’t provide a way to perform data fetching on route transitions, though it can be achieved via onEnter but I find it far from ideal since it pollutes the routes definition and more importantly it doesn’t scale very well.
In fact in the guides it suggests to perform data fetching in your components life cycle hooks.
UI-Router flexible params and resolves
A state che be parametrized. The parameter value can be encoded inside the URL, but it’s not necessary. We can define state parameters in three locations:
- URL path (
:paramName) - just like react-router - URL Query (
?paramName) - same, but will live in the URL query - Non-URL - you may define any parameter data, this will not reflect the URL
We can also define default parameters, and may also decide to hide the param when the value is the default value.
Another cool thing is the ability to define a param type.
They are encoded as strings in the URL but converted back to native when retrieved in your code.
Beside the default type built in (string, int, bool, date and json) you may also define custom types, by providing your own encoding/decoding logic.
Resolve
UI-Router let you define resolves for each state. This mechanism is a first class participant in the state transition.
When a state is entered the resolve data is fetched.
Resolve functions can return Promises for async data fetching, and if any of these are rejected, the whole transition promise is rejected and the error hooks are invoked.
Data resolving is declarative, where every state defines what data should be fetched. Resolves may depends on other resolves’s results (both being from the same state or coming from an ancestor state).
The whole resolve system is in fact a dependency injection system between the states’ resolves. And since any resolved data is passed to the rendered components via props, can be used as DI for the components (high order, container or whatever we may call them).
An example of resolve data declaration with url params:
const myState = {
  name: 'myState',
  url: '/myState/:myParam',
  component: MyComponent,
  // The param is part of the URL, but we define a default one when it's not provided
  params: {myParam: "default"}
  resolve: [
    {
      token: 'resolve1',
      deps: ['$transition$'],
      resolveFn: (trans) => MyAPIservice.getWhatever(trans.params().myParam)
    }, {
      token: 'resolve2',
      deps: ['resolve1'],
      resolveFn: (resolve1) => MyAPIservice.getSomethingElse(resolve1.id)
    }
  ]
}
Since the transition will succeed if every resolve is successful, we are sure that <MyComponent> will have props injected for resolves at component creation. This means we can perform prop validation on the component:
class MyComponent extends React.Component {
  // code code code
}

const PT = React.PropTypes; // for convenience

MyComponent.propTypes = {
  resolves: PT.shape({
    resolve1: PT.object,
    resolve2: PT.arrayOf(PT.string),
  }),
};
Additional info
UI-Router React just came out, but the core router has been released first in 2013. Since then, is has almost been completely rewritten for version 1.0.
Framework Agnostic
Since version 1.0 of UI-Router, the core package is framework agnostic. This is what made having a React implementation possible. Currently UI-Router supports Angular 1/2 and React. This is a huge advantage for anyone who wants to move to/try a new framework. Since the implementations only differ in the views/links components, it also becomes trivial porting an application from one framework to another.
Being both an Angular and React user myself, I love being able to structure my applications regardless the framework in use. Since I started developing in React I always missed the flexibility of UI-Router, and that’s what eventually led to working on this implementation.
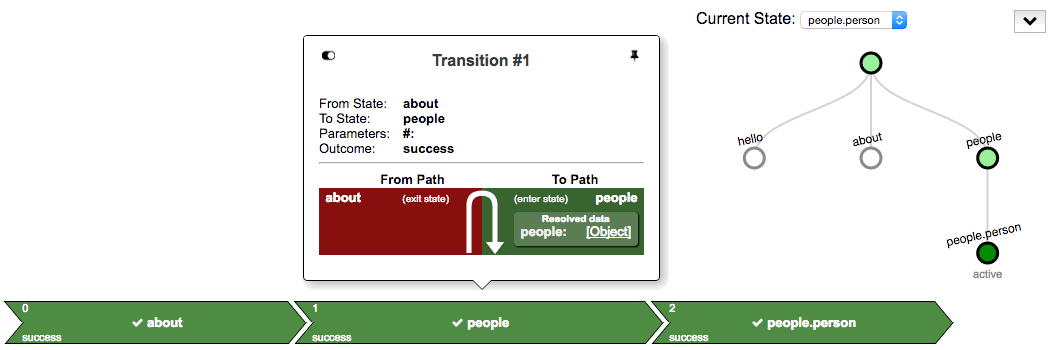
State and Transition visualizer
The state and transition visualizer is a very handy tool for developers. It’s a drop-in utility that lets you visualize the state tree and transitions of your UI-Router application. It’s written in React, and works both on every implementation of UI-Router.
Getting Started
If you are interested in getting started with UI-Router React you can find tutorials on the library website. There is also a sample app available that show most of the features UI-Router provides.
I really hope this can be helpful for you. Feel free to contact me if you any doubts and I hope I can help out. If you find bugs or want to help, you can file an Issue or a PR.